Add real-time Messaging, Calls, and Conferencing to your Flutter App in just 30 minutes
In less than half an hour and with under 100 lines of Flutter code, you can integrate real-time messaging, group chat, video calls, voice calls, and conferencing into your Flutter app for both Android and iOS. No complicated coding or setups required – just grab your coffee and let’s dive in!

We promise to keep this short – within 30 minutes and less than 100 lines of code, your Flutter app will have impressive features such as real-time messaging, group chat, video and voice calling, and conferencing. Plus, you can easily customize everything with just a few more lines of code.
Since we only have 30 minutes, we will quickly get on coding.
Let’s dive in and build it within 30 minutes!
Step 1: Download and Setup Flutter Sample App Code (Time left: 30 minutes)
Let’s start this tutorial by downloading the source code for a sample Flutter app. This step will not only kickstart the tutorial but also provide a practical demonstration of how straightforward it is to code and integrate real-time messaging, group chat, video and voice calling, and conferencing features into your Flutter application.
After going through the tutorial, you can copy the relevant code in your own app, which contain less than 100 lines.
$ git clone https://github.com/mesibo/samples.git
$ cd samples/flutter
Install or upgrade mesibo SDKs by:
$ flutter clean
$ flutter pub upgrade
$ cd ios
$ pod update
Step 2: mesibo Developer’s Account (Time left: 25 minutes)
Sign up for a free mesibo developer account here. This account is necessary to obtain the API key.
After logging in, click on the “New Application” button to create a new application, let’s call it “FirstApp.” This application will cater to all platforms, including Android, iOS, and web.

After creating your application, take note of the App Token, which will look like this:
87pbh20pzehd9ld0o0pxqx9h80jjqfu9ipul4l00fnb55pbfx9mxyyk4uyr1iwuw
Step 3: Create Users (Time left: 20 minutes)
Next, we will create two test users to communicate between. You can use any identifier like phone numbers, emails, or whatever suits your app. Here, we will name them 123 and 456 for simplicity.
We will create test users by calling mesibo’s backend API. This generates an authentication token for each user, referred to as a User Access Token. Later, we will use these User Access Tokens in our Flutter app code (lib/main.dart) to initialize mesibo for each test user.
Calling the mesibo backend API to generate user access tokens requires only two parameters:
Address: A unique ID for the user. This could be a phone number, email, etc. For our test users, we will use the simple strings
123and456.App ID: The unique app identifier. For Android, this is the package name defined in
AndroidManifest.xml. For iOS, it is the bundle ID in Xcode. Since we are building a cross-platform Flutter app, use a consistent value across platforms - we will usecom.mesibo.firstappfrom the downloaded code.
Let’s generate an access token for our first test user 123. Send the following JSON request to https://api.mesibo.com/backend/ with address 123 and appid com.mesibo.firstapp. You also need to send App Token to authenticate your request.
{
  "op":"useradd",
  "token": "87pbh20pzehd9ld0o0pxqx9h80jjqfu9ipul4l00fnb55pbfx9mxyyk4uyr1iwuw",
  "user": {
	"address":"123",

  	"token": {
		"appid": "com.mesibo.firstapp",
		"expiry": 525600
  	}
  }
}
You can use the mesibo backend API explorer tool to send requests and view the responses. Alternatively, you can also use curl, Postman, or any of your favorite tools to send API requests.
The response will look like this:
{
  "user": {
    "uid": 289647581,
    "address": "123",
    "token": "b24e5174cb0acfbec8207f8d8ec34ccc442b3d254375e567a03feoc9fa872"
  },
  "op": "useradd",
  "result": true
}
The token in the API response is the User Access Token we need. Open lib/main.dart in our Flutter project, which has code like:
DemoUser user1 = DemoUser("user-access-token-for-user-1", 'user-1-address');
DemoUser user2 = DemoUser("user-access-token-for-user-2", 'user-2-address');
Now replace user-access-token-for-user-1 with the user access token from above response, and replace user-1-address with the the address we used that is 123.
Similarly, create user access token for 456 and replace user-access-token-for-user-2 and user-2-address.
That’s it!
Step 3: Run the App (Time left: 10 minutes)
Now we’re ready to take the app for a test drive! The app provides options to login as the two test users we created earlier.
Launch the app on two devices or simulators. On one, login as user-1 and on the other, login as user-2. Note that, for iOS, it must run on a real device.
When you tap login on either test user, the app will begin connecting to mesibo’s servers. You should see the connection status displayed on screen.
The app should successfully show an “Online” status without any issues. However, if it fails to connect, the likely culprit is an invalid user access token. Don’t hesitate to reach out to us at support@mesibo.com and we’ll be glad to troubleshoot!
Once logged in, you’ll see various buttons to send messages, make video & voice calls, and more. Feel free to experiment and explore the communication capabilities. Send text chats, rich media messages, make 1-to-1 calls between the test users, etc.
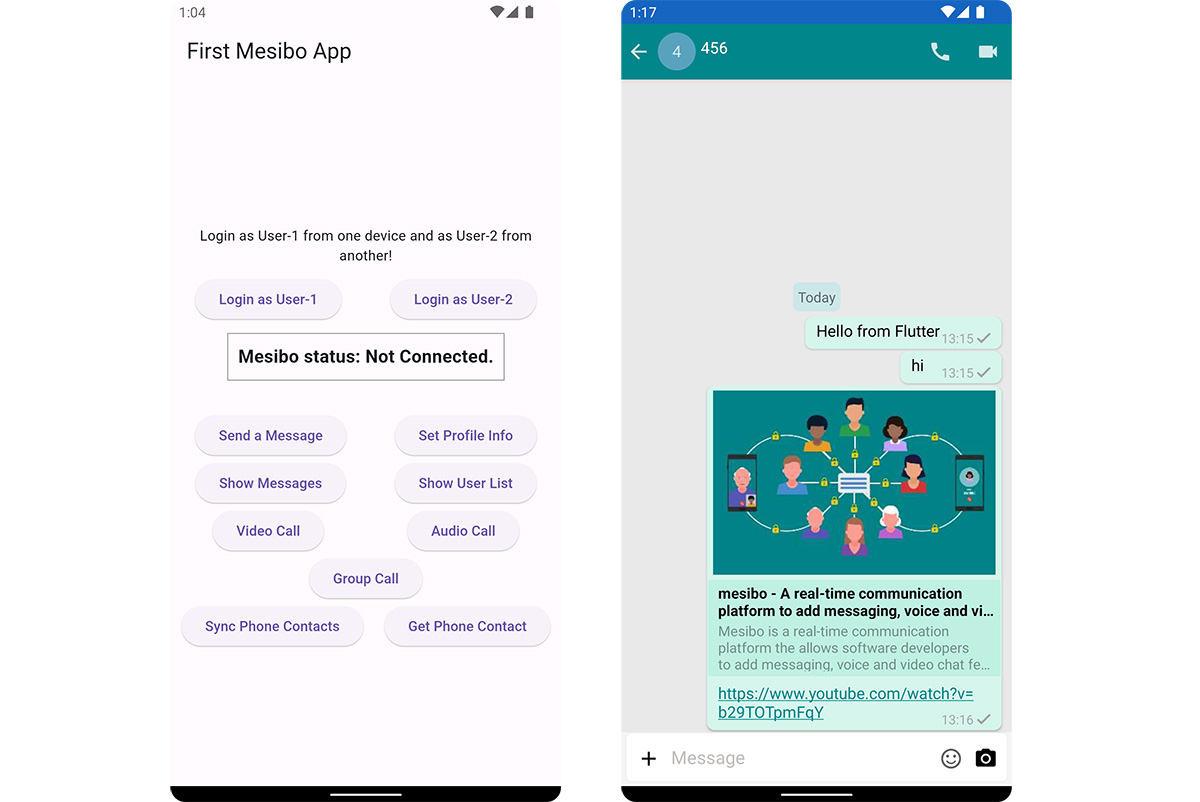
You can now create groups and add multiple users to try conferences. Refer to the sample code to see how easy mesibo makes group management and conferencing.
In just 30 minutes,, you’ve created an impressive app with rich communication capabilities like messaging, voice and video calls! Let’s understand code now.
Understanding the Code
The entire Flutter code is in lib/main.dart. The mesibo related code is very small and quite self-explanatory, but let’s go over the key pieces:
Adding real-time communication features like messaging, calling, and conferencing in your app with mesibo takes just 2 main steps:
1. Setup Listeners so that so that mesibo can inform you of various events such as incoming messages, calls, message status, etc.
mesibo uses listener functions to notify your app about various events. For example:
Mesibo_onMessage- Called when a new message is receivedMesibo_onDeliveryStatus- Message delivery or read notificationsMesibo_onConnectionStatus- Connection state changes
You simply define callback functions in your app code for the events you care about. The sample app in lib/main.dart already implements a few useful listeners:
@override
void Mesibo_onConnectionStatus(int status) {
    print('Mesibo_onConnectionStatus: ' + status.toString());
}


@override
void Mesibo_onMessage(MesiboMessage message) {
    String groupName = "";
    if(null != message.groupProfile)
        groupName = message.groupProfile!.name!;

    print('Mesibo_onMessage: from: (' + message.profile!.name! + ")
            group: (" + groupName + ") Message: " + message.message!);
}

@override
void Mesibo_onMessageStatus(MesiboMessage message) {
    print('Mesibo_onMessageStatus: ' + message.status.toString());
}
2. Initialize mesibo with user access token, listener object and start
Once you define listeners in your code, you need to inform mesibo about it to call them when required. We also need to initialize the mesibo with the user access token for authentication.
Here is how it looks in code (lib/main.dart):
void initMesibo(String token) async {
    // get mesibo API instance
    Mesibo _mesibo = Mesibo();

    // initialize mesibo
    _mesibo.setAccessToken(token);
    _mesibo.setListener(this);
    _mesibo.start();

    ...
}
After initialization, call start(). mesibo will start connecting to mesibo’s servers. You can now call various functions such as messaging, calls, etc., as per your application’s requirements.
The sample app also includes code to easily customize the UI to match your branding. Take a look at the following snippet from main.dart that customizes the app name and toolbar color:
_mesiboUi.getUiDefaults().then((MesiboUIOptions options) {
    options.enableBackButton = true;
    options.appName = "My First App";
    options.toolbarColor = 0xff00868b;
    _mesiboUi.setUiDefaults(options);
});
Next Steps
As you have discovered, mesibo APIs are straightforward to integrate for adding real-time communication features in your app.
To go further with mesibo and unlock more advanced features:
- Read the Get Started guide for a comprehensive overview and tutorials
- Explore the in-depth API reference documentation
And as always, the mesibo team is here to help anytime at support@mesibo.com!
Let us know what cool apps you build. Happy coding!